Lawn Mowers


Underground Sprinkler Installation and Testing

October 21st, 2017 ernie Posted in Sprinkler Systems No Comments »

underground Sprinkler Installation and testingThis is our second post about underground sprinkler installation and testing. Our earlier post covered setting up the manifold and the timer as well as laying out where the trenches will be dug. This post covers installation of the pipe, risers and sprinkler heads along with testing. Your trenches are already dug and it is time to install the pipes, risers and sprinkler heads.

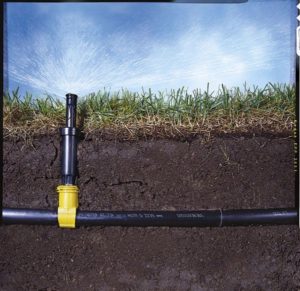
Install pipe, risers, and sprinkler heads. Lay out pipe and fittings on the ground, work backwards to the manifold, assemble and solvent weld pipe and fittings in the trench.

Measure the trench depth at each sprinkler head location, making the head flush with the soil surface. If you are installing sod, make the head 1 inch higher than the soil surface. Install risers, making further height adjustments as needed.

In areas where the soil freezes in winter, install drain valves at the lowest point in each circuit in between the control valves and the first gate valve near the water meter. Use a level to avoid having any water pockets in the system. Slightly tilt the drain valves down word in each circuit, cover them with a short piece of pipe, surround them with gravel then cover them with plastic film. Never put a drain valve in a fitting before attaching the fitting to the pipe; PVC solvent make log the valve.

After the pipe and risers have been installed, wait 12 hours for the solvent to dry. Then turn on the water to flush out any dirt, stones or scraps of PVC from pipe lines. When the pipes appear to be clear install the sprinkler heads.
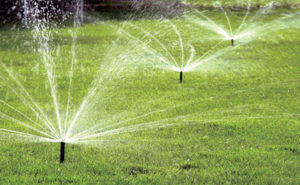
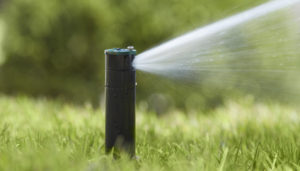
Test for coverage.

Turn on each circuit one by one; inspect the sprinkler pattern carefully to make sure that every part of the ground is receiving adequate coverage. At this point, it is easy to add sprinkler heads if they are needed.

Backfill the trenches. Replace the soil in the trenches a little lower than the final soil line. Flood the trenches with water to settle the soil, then add more soil so that the back fill is mounded slightly. It will settle later.

This completes our second post regarding underground sprinkler installation and testing. Watch for more post about lawn mowing and taking care of your lawn. For other posts about sprinkler systems, click here.

Save

AddThis Social Bookmark Button

Underground Sprinkler Installation

October 7th, 2017 ernie Posted in Sprinkler Systems No Comments »

We are continuing series of posts about underground sprinklers in residential lines. We have covered the planning and ordering of materials. This post will be about installing your underground sprinkler system. Underground sprinkler installation is relatively straightforward provided that you follow a set of rules and guidelines as follows.

Install the manifold. First, turn off the water to the house. Cut a 1 1/4 inch section from your service pipe and install a T fitting. Several special tees are available for cutting into lines. Ask at a local hardware store.

Install a length of pipe and a shutoff valve in a valve box. The shutoff valve is usually a gate valve and allows you to turn off the water to the sprinkler system without turning off the house water. Once the valve is turned off, you can turn the house water back on. Run lines to the manifold location and install the control valves. It is usually easiest to assemble the manifold at the shop bench, Then carry it to the site and install it. Close the valves, open the shut off valve, and test the manifold for leaks.

Underground Sprinkler Installation – Install the controller

If you are using automatic valves and an electric timer, install it according to the manufacturer’s instructions, and lay the connecting wire to the valves. Most timers run on a voltage that is low enough, 24 V, to let you bury the wire directly without enclosing it in conduit. Position the timer where it is protected from sun and rain and it’s close to an electrical outlet; the garage is ideal. The position of the timer may influence the location of your control valves.

Mark the layout on the lawn. Drive a stake into the ground at each sprinkler head location. Sprinkle agricultural lime on the ground to mark where trenches are to be dug.

Dig trenches. Next to your pipe layout, use of a spade or rent a trencher to dig trenches. Make the trenches at least 8 inches deep.

Now you are ready to install the pipe, risers and sprinkler heads. Our next post will cover the details associated with this step. Check all of your measurements, especially before digging to ensure that all of your trenches will be in the correct location.

For more information about sprinkler systems, click here.

Save

AddThis Social Bookmark Button

Underground Sprinkler Shopping List

September 7th, 2017 ernie Posted in Sprinkler Systems No Comments »

Underground Sprinkler Shopping ListThe next step is to create your underground sprinkler shopping list of parts and supplies that you will need to install your underground sprinkler system. The plan that you drew up will be the source of all the information that you will need. If the plan is wrong or if you make a mistake in transcribing the requirements you may find that you’re short of parts or have the wrong parts. The following is a step-by-step approach to creating your shopping list.

Preparing your underground sprinkler shopping list.

On the plan, write the catalogue number of each sprinkler head and valve. At each intersection or turn in the pipeline, write the fitting needed. Measure the number of feet of pipe needed. Now make a shopping list, transferring items one at a time from the plan to the list. Include PVC cement. If you are using an automatic controller, add it to the list, along with enough wire and wire connectors to wire each valve to the controller.

To avoid costly problems, have your plan checked by a specialist before you begin. The retail dealer who supplies your equipment may offer help, in which case you can have it checked free of charge. Otherwise, it is money well spent to engage the services of an independent installer.


Save

AddThis Social Bookmark Button

Design rules for an underground sprinkler system

August 21st, 2017 ernie Posted in Sprinkler Systems No Comments »

 Design rules for an underground sprinkler systemThis continues our last post about planning an underground sprinkler system. This post will cover some design rules for planning an underground sprinkler system for residential homes. Basic rules for a sprinkler system are essential to ensure proper lawn watering and a healthy lawn.

Design rules for an underground sprinkler system

Areas covered by one circuit must be watered together for watering needs.

Each circuit should use no more than 75% of the available flow rate. To determine each circuit’s flow rate, add the sprinkler heads’ flow rate as given in the catalog description.

Do not mix different types of sprinkler heads, e.g., impulse, spray, shrub bubblers, etc., on one circuit.

Take your time planning the circuits. It may take two or three tries to get it right.

Next, draw the pipe from the house water supply to the manifold. From there, draw in every valve to every head on the circuit. Plan to use the same trench for installing two or more waterlines whenever possible. Avoid going under walks or driveways or near trees. If you are using PVC or another rigid pipe, draw straight lines with right-angle turns, you can lay polyethylene pipe in curves.

Following these Design rules for an underground sprinkler system will make a massive difference in your success as a lawn gardener.

AddThis Social Bookmark Button

Planning an underground sprinkler system

August 7th, 2017 ernie Posted in Sprinkler Systems No Comments »

Planning an underground sprinkler systemPlanning an underground sprinkler system involves several stages. To begin with, consumers should check to see if their locality requires a building permit. Next, check for underground utilities before digging. Find out if there are any local municipal watering ordinances and finally find out your state and local regulations requiring a licensed professional installation if any. Then begin planning an underground sprinkler system for your yard.

Planning an underground sprinkler system

Next you you must begin planning the layout of your underground sprinkler system. Drawing your plan on paper helps you to visualize your underground sprinkler system. A carefully prepared plan helps when ordering materials. It makes it easier to get advice from your garden center, irrigation specialist, or hardware dealer. It serves as a detailed record of where the pipelines are laid.

Begin planning an underground sprinkler system with graph paper, 10 grids to an inch is fine. Use a soft lead pencil, a dime store compass, and a measuring tape. Make your plan complete. A good plan is actually a Birdseye view of your property drawn to scale, preferably 1 inch equaling 20 feet. It should show shrubs, trees, paved areas, fences, mailboxes, raised planters, very drainage or powerlines, and other features that could affect the sprinkler design and installation. If significant, note prevailing wind direction, sun and shade areas, as well as high and low spots in your landscape.

Draw out the Plan

Draw the plan for both front and back yards, even if you plan to install The system in only one area. You may want a similar system in another area at a later date. If you want to include sprinklers for trees and shrubs, indicate any water-sensitive or especially thirsty plants on the plan.

Next, draw in the location of the sprinkler heads. Set your Compass to match the radius of the sprinkler head pattern, available from the manufactures catalog. Locate a quarter circle head in each corner of the lawn, set the compass point I need to head location, and draw a quarter circle to show the area covered by their head. Next, locate half-circle heads along the edges of the line. Space the head so that their spray pattern overlap at least 60%. If you live in a window area, overlap them 100%, so that the spray from each head touches joining heads. Finally, fill in the center area to the line with full circle heads.

It is all right to overlap spray patterns more than is needed to make everything fit but do not space heads too far apart. If one section of the lawn receives less water than the rest, it will die from under-watering unless you could water it by hand.

Once you have located the heads, draw light circles around those that are to be in the same circuit, and follow these rules with arranging the circuits.


AddThis Social Bookmark Button

Valves and Circuits

July 21st, 2017 ernie Posted in Sprinkler Systems No Comments »

Valves and CircuitsThe manifold is the control unit of the sprinkler system. It is composed of a group of control valves that deliver water to different parts of the lawn. Position it in a convenient spot, where you can turn it on and off without getting wet. Try to conceal it with a cover or box, since the plumbing is seldom attractive. One manifold each is needed for a front lawn and another is needed for the back lawn. Together they are referred to as valves and circuits.  It should also be placed in a position that is secure and cannot easily be tampered with. You might consider placing the manifold at the side of the house inside the perimeter fence that surrounds your yard for example.

Valves and Circuits

The control valves that make up the manifold are usually globe valves. They are the same type of valves used for faucets in the house. The globe valve shut off the flow of water by pressing a soft disc against a smooth valve seat.

Control valves often have anti-siphon valves attached to them. Anti-siphon valves, also known as vacuum breakers, prevent the backflow of water into the housing supply. As a result, they are sometimes required by local ordinances and are always a good idea to include.

Each control valve controls several sprinkler heads. This group of sprinkler heads is called a circuit. Two factors control the number of circuses you need. What is the available flow rate? If too many sprinklers are turned on at one time, the water pressure drops, preventing the heads from throwing as far as they are supposed to. For proper coverage, it is best to turn on one circuit at a time.

The other factor to consider is the watering needs of different areas. For example, if a shrub bed is on the same circuit as the lawn, the shrub bed will be watered as often as the lawn, even though it does not need as much water.

AddThis Social Bookmark Button

Sprinkler Heads and Risers

July 7th, 2017 ernie Posted in Sprinkler Systems No Comments »

Although a wide variety of sprinkler heads is available for every conceivable application, most residential homes are best served by adjustable, pop-up sprinkler heads and risers with full. half circle, and quarter circle watering patterns. When not in use, the head rests flush on the ground, out of the way of the mower and foot traffic. Each sprinkler head discharges a specific number of gallons per minute over a given radius, and each requires a certain water pressure in order to achieve its designed throw.

Sprinkler Heads and Risers

Most sprinkler heads have a flow control to adjust how far the water is thrown. Heads set for a specific arc are the most popular, such as three-quarter, 30°, and 60° arc. Heads with adjustable arcs are hard to find and expensive. If you do buy a head with an adjustable arc, check the specifications to make sure that this feature does not drastically affect the throw rate. This could change your watering strategy.

Sprinkler heads with a square pattern and a low precipitation rate are also available. A square pattern is useful in narrow areas such as side yards and in parking strips. Use low precipitation ahead where runoff is a problem due to sloping grade or clay soil.

Whenever possible, group sprinkler heads by the requirements of an area. Besides pop-up spray heads, impulse sprinklers are useful for watering large areas. However, they are difficult to use efficiently for smaller ones. If wind is a problem, place a pop-up sprinkler with rotary action in the center of a lawn area. It will disperse water evenly in large drops rather than a spray.

Risers

Risers bring the water from the underground pipe to the sprinkler heads. The height of the risers must be carefully adjusted. Several types of risers are available to make this adjustment easier. Cutaway risers have sections of thread in short increments along their length. It is easy to cut away small 1/2-inch pieces, one or two at a time until the proper height is reached. Flexible risers also require proper height adjustment, but if the sprinkler head is accidentally kicked or hit by a lawn mower, the risers flex rather than break.

AddThis Social Bookmark Button

Flow Rate Underground Sprinkler System

June 21st, 2017 ernie Posted in Sprinkler Systems No Comments »

One of the most important aspects of installing a sprinkler system successfully is determining the available flow rate: the rate at which water travels through a pipe, measured in gallons per minute. The easiest way to find the available gallons per minute is by using a special gauge. Many sprinkler suppliers will loan this gauge on request.

Another way to deduce the available gallons per minute is to measure how many seconds it takes an outdoor faucet, turned wide open, just to fill a 1-gallon container. Dividing the total number of seconds into 60 gives you the flow rate in gallons per minute.

Flow Rate and Piping

For most sprinkler systems, galvanized steel and copper pipes have gradually given way to lightweight PVC pipes and flexible polyethylene pipes.

Ease of handling, assembly, durability, flow characteristics, cost, and availability for all reasons for recommending PVC pipe in solvent weld fittings as the piping for sprinkler installations. Use the heavy-duty schedule 40 for all pressure-holding lines. To save money and materials used class 200 or class 315 pipe for lateral Lines that will never be required to hold constant pressure.

The less expensive but less substantial substitute for PVC pipe is flexible polyethylene pipe. It comes in 100-foot and 100-hundred-foot rolls and can be cut with a knife. Fittings are inserted into the pipe and held in place with stainless steel clamps tightened with a screwdriver or wrench. The advantage of polyethylene pipe is that it does not restrict you from following straight lines. However, this pliability is a disadvantage as well. You can cut through it with a spade while digging in your garden without being aware of it. Rodents, especially gophers, like to chew holes in it. And it cannot handle enough pressure for it to be used between the water meter and the control valves.

In general, unless you have a large lawn, the three-quarter-inch pipe is sufficient for the entire system. If water needs to travel more than 100 feet, the friction of water through the three-quarter-inch pipe may reduce the available gallons per minute. Use a 1-inch pipe for distances over 100 feet to avoid this occurrence.

Our next post will talk about sprinkler heads and risers.

Save

Save

AddThis Social Bookmark Button

Installing Underground Sprinkler Systems

June 7th, 2017 ernie Posted in Sprinkler Systems No Comments »

Installing Underground Sprinkler SystemsAfter you have decided to Installing Underground Sprinkler Systems? You need to decide how much, if any, of the work you’re going to do yourself. Companies specializing in here in irrigation get can often install a system within a few days. Doing it yourself may take several weekends. If the sprinklers need to be installed before planting a new lawn, The clutter of materials and equipment may not be important. In an established lawn, however, it may be bothersome, even damaging. Cost is also a consideration. If you are handy with tools and have the time, it is much less expensive to do it yourself.

Installing Underground Sprinkler Systems – Choosing a system

Once you decide who is doing the work, be sure to choose the manufacturer as well as the supplier carefully. Consult neighbors who have underground systems. Ask irrigation specialists,  nursery workers, or your real estate agent for advice about the trade name that best suits your needs. Then either write the manufacturer or see your local distributor obtain detailed information. If you are installing the system yourself, before purchasing it read the installation instructions. Make sure they are easy to follow.

Note that if you live in a cold climate where it gets below freezing in the winter, you will need to drain the pipes of all water and seal them. Water freezing in the lines will rupture the pipes and make them useless for the next season. If you are uncomfortable doing this work yourself arrange for a maintenance contract to close the system in the fall and re-open it in the spring. Underground sprinklers are a great way to ensure that your lawn gets enough water and all areas of the lawn are covered.

Our next post will discuss Flow Rate and piping.

AddThis Social Bookmark Button


?>


Web Content Development